Procedural Shading
4003 590-01 /
4005-769-01
SPRING 2008
Lab 5 --
Lighting
Introduction
The goal of this
lab is explore ways of defining customized lights using shaders.
Shaders
In this lab, you will build a shader that models a spotlight used in
the theatre and cinema. Like with the last lab, I will ask you
to build your shader in phases, each phase adding an additional feature
to the light shader.
The three phases
are as follows:
- BASIC:
Basic definition of the spotlight cone
- INTERMEDIATE:
Focus control
- ADVANCED: Use
of textures to simulate the use of gobos.
As always, starter code is available from this zip file.
Part 1 -- BASIC
For this first part, you are to define a basic spotlight. In
addition to the position (from), direction(to), and color (inten) of
the light, your shader should allow, as parameters, the field angle and
beam angle for the light. The intensity of the light
should also fall off based on the distance from the light to the
surface being illuminated (the basic 1/d^2 falloff can be used).
Just as a reminder, as illustrated in the diagram below, the
beam angle is the angle, measured from the direction vector, at which
the intensity of the light falls off to 50%. The field
angle is the angle at which the intensity falls off to 10%.
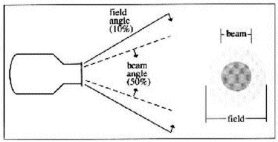
A smooth interpolation of the intensity (from 100% to 50%) should be
performed for angles from 0 degrees to the field angle.
Interpolation of the intensity (from 50% to 10%) should be performed
for angles between the beam angle and the field angles.
You may wish to use the smoothstep function for this
interpolation. Any point outside of the range of the field angle should
be considered as not being illuminated by the light.
Remember that Cg does not have an illuminate construct. Thus you
will have to write a Cg function to emulate that.
Part 2 -
Intermediate
In the real
world, many lighting instruments provide a focus control that will
enable the light to have a hard beam or a soft beam. Introduce a
new parameter to your shader called "focus" which will control
variability within the region between the beam and field angles.
A focus of 0.0 indicates a soft focus. In this case, the
field and beam angles should be unaffected. If focus is 1.0, this
indicates a sharp focus. In this case, the effective beam angle
should extend to the end of the field (in essence replacing the field
angle effect). Any value between 0 and 1 would move the effective
beam angle part way into the region between the filed and beam areas.
Part 3 - Advanced
In
Part 3, you will be adding a gobo to your lighting instrument.
The
gobo acts as a filter and is used to shape the beam. You
can use a
texture image for the representation of the gobo pattern. Unlike
previous labs, this texture will not be mapped on any piece of geometry
the scene. Instead, you will have to determine the s and t values
based on the direction of the light and the vector from the light to
the surface point being illuminated. The mapping should be
set up so that the entire beam fills the texture image as indicated
below.
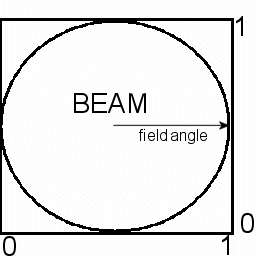
This is a perfect use for projective texture mapping.
In order to perform projective texture mapping, you need to
transform the appropriate points and vectors to projective light space.
The matrix required to convert a point from world to
light space can be found in the slides on lighting. Since
OpenGL does not give you direct access to world space, it is best to
convert from eye space to light space. Thankfully, setting up
this transformation matrix can be done efficiently by playing games in
your OpenGL application code. ( here is a link
to a page that indicates how you
might do this ). The starter code for the GLSL portion of
this lab has set up this matrix. You'll need to pass and use this
matrix in your shaders. Some notes on this process:
- Setting up
this transformation requires that you take the inverse of a matrix.
Included in the zip file is a function (courtesy of Ken Perlin)
for inverting a 4x4 Matrix. You will find this code in the file matrixInvert.c
- uniform matricies can be passed from OpenGL code to GLSL shaders via the glUniformMatrix4fv function.
- To
read in the texture for the gobo, you'll need to make use of the DevIL
libraries (now correctly installed on all of the Macs in ICL5).
The correct calls for setting up a texture read using DevIL is
also included in the lab5.cpp file.
Just as a final
note, you can play the same kind of games with RenderMan and do the
coordinate transformations in the RIB file (this is the approach taken
by the text). However, I do not provide a RIB file that does
this.
Note that for this part, you need to only implement in either RenderMan
or Cg
(not both). Much partial credit will be given for any
valiant effort. Feel free to use the star pattern found in star.bmp and star.tiff found in the textures folder of the zip distribution.
last updated: 04/28/08